

</center>
<center><textarea id="code-source" rows="3" cols="13" name="code-source"><center><a href="http://YOUR WEB ADDRESS/"><img border="0" src="http://IMAGE WEB ADDRESS"/></a></center></textarea></center>
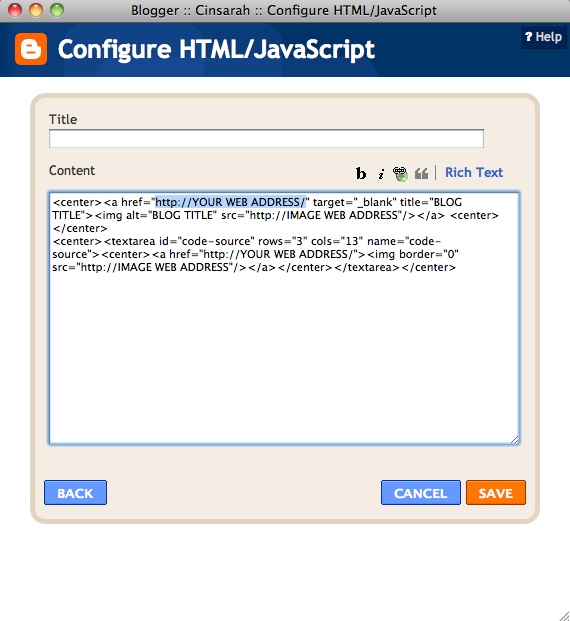
You will need to replace the highlighted sections with your
blog/website address, blog name & image web address.
Here is what my code looks like with all of my info replaced:
<center><a href="http://cinsarah.blogspot.com/" target="_blank" title="Cinsarah"><img alt="Cinsarah" src="http://i1200.photobucket.com/albums/bb323/Cinsarah/cinsarahbutton-2.jpg"/></a> <center>
</center>
<center><textarea id="code-source" rows="3" cols="13" name="code-source"><center><a href="http://cinsarah.blogspot.com/"><img border="0" src="http://i1200.photobucket.com/albums/bb323/Cinsarah/cinsarahbutton-2.jpg"/></a></center></textarea></center>
NOTE:
Be careful not delete any of these " or the code won't work!
Make sure to change every section that needs to be changed.
The bottom section will be your grab code.
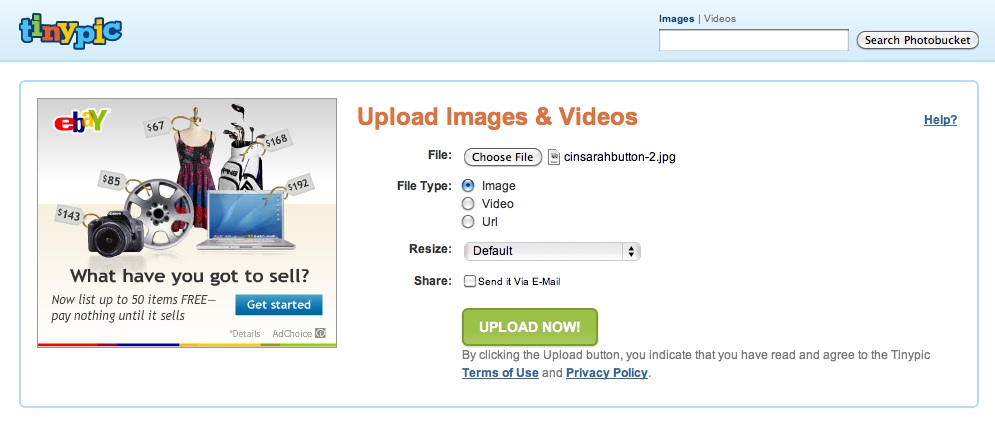
You will need to upload your button to a photo hosting site such as Photobucket. If you don't have photobucket and don't want to sign up for an account just for a button there is a free site I like to use once in a while and it's tinypic. You can upload your button on tinypic....

Once you have finished replacing what needs to be replaced from your code hit
Save and move the gadget wherever you would like your button to be
and voila you've got yourself a grab button on your blog...

Let me know if this worked for you or if you need any help!
I would be more than happy to help! :)


Thanks for an awesome tutorial. I’d love for you to link your great tips to Things I’ve Made Thursdays (going on now until noon tomorrow). I’m trying something new this week- We have two sections to the party- one for kids’ things and one for “Anything”!! I think this post would be an awesome addition to the “Anything Goes” party!
ReplyDeleteHope you’ll stop by and link up!
Melanie
http://bearrabbitbear.blogspot.com/2011/09/things-ive-done-thursday-new.html
Sure adore my tech-savvy friend! You are so knowledgeable at all of this. Thanks for sharing!
ReplyDeleteThis is great! Thanks so much for posting it!
ReplyDeleteCindy, I LOVE you! You fixed it so I could get the Psalm subway art printout. And now, on my 2nd day as a blogger, you're rescuing me from utter confusion. If you stop by you'll see I'm fumbling in the dark as I go along. I meant to have Scripture on it when it published, but my brain was so tired by the time I did what I did, I forgot. You, my sister, are an answer to this woman's prayer! craftythriftydecoratingwifemom.wordpress.com
ReplyDeleteThank you sooooooo much for sharing this! I have been wondering how to do it & was sure that I would have to either search the internet for hours or pay someone. Thank you, thank you!! :)
ReplyDeleteI just became your newest follower! I would love for you to check out our blog & follow us back if you'd like.
Also, check out our giveaway for a Tiffany & Co. necklace!
Blessings,
Kat
www.maryanddyer.blogspot.com
awesome tips!! im looking on the internet all the time for idea on to make the blog look and function better. this would be something i wanna look into..
ReplyDeletethanks again!
xx, zhing
Loved how your tutorials are so easy to follow... just used this one! Thanks so much again! :)
ReplyDeleteThis still did not work for me. *sigh*
ReplyDelete^I know how you feel! I have been struggling with this for a long time! Thankyou so much for the tutorial it really helped me! For some strange reason, every time I try to put up a button with a code box underneath, everything works fine except the code does not appear in the little box! So frustrating! Anyways, thankyou again for this great, helpful tutorial!
ReplyDelete